How to Prove Array as a Reference type variable ?


As, we know that variables like int, float, double etc. are value type and Array is a reference type variable. To, prove this by a program here we go:


1: let define and declare 2 different array and name them according to you, I’ve given them name as array1 and array2.

2: I’ve put their values as {1,2,3} for first and {10,20,30} for second.

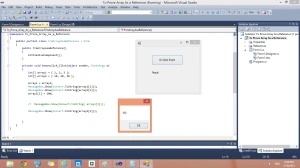
3: Check their values through message box.

4: Now Let’s assign the value of array2 to array1.

5: Now, explicitly change the value of 1st element of array1.

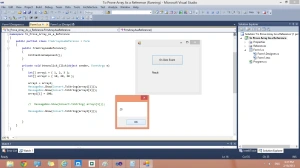
6: Now, check the value of 1st element of Array2.


and you’ll see that the value of array2 is changed by default and this is a property of reference type.


Thanks,

Source Code:

namespace To_Prove_Array_As_a_Reference

{

public partial class FrmArrayAsaReference : Form

{

public FrmArrayAsaReference()

{

InitializeComponent();

}

private void btnonclick_Click(object sender, EventArgs e)

{

int[] array1 = { 1, 2, 3 };

int[] array2 = { 10, 20, 30 };

array1 = array2;

MessageBox.Show(Convert.ToString(array1[1]));

MessageBox.Show(Convert.ToString(array2[1]));

array1[1] = 100;

MessageBox.Show(Convert.ToString(array2[1]));

}

}

}

Output2 output

Previous Year Question Paper (GGSIPU) till 2010 MCA 4th Semester

Previous Year Question Paper for MCA 4th Sem. 2010-13 Batch

How to Get Powered By Ubuntu Stickers for Your System ?

If your like me, you’ve probably installed a linux distribution or two on your old Windows pre-installed hardware but now have that old “Powered by Windows” sticker looking back at you. Well not anymore. If you don’t want to print out some stickers on your own from templets found on the internet, System76, the company who sells Ubuntu Linux pre-installed on Desktops and Laptops, provides professional quality stickers for your current hardware so you can replace or place alongside your “Powered by Windows” sticker. All you need is to send a stamped and self addressed envelope to them and expect to wait for a couple months. You receive 4 “Powered by Ubuntu” stickers and 4 SuperKey stickers. Please excuse the missing stickers in my photo because I’ve used them on my old HP Compaq and Dell Inspiron back when I first received these.

https://www.system76.com/community/stickers

How to create a chat with ajax

Howdy!

In our JSF project, which I am currently working on, there was a problem to create a chat in order to enable users to communicate. Today I’ll show you how to create a simple chat using JSFPrimeFaces and ajax.

Main Idea

The idea is quite simple. Somewhere on the server (e.g. in the database) there are messages. On your web-page there is a message box in which all chat messages are displayed. Each second the web-page requests the server for new messages, and if there are any, adds them into message box.

Problems

  1. We have to ask server for new messages every second by invoking JSF managed bean’s method. How?
  2. Managed bean (server side) has to return new messages to the web-page. How?
  3. After page is loaded (ready) the message box should be updated and contain all recent chat messaged. How?

Solutions

As it was said above, I am describing a solution for PrimeFaces library. But if you don’t (or unable to) use it, there might be a similar solution. See specifications of your particular library.

The first problem is very simple to solve. In PrimeFaces, there are different (at least two) components for invoking JSF managed bean’s method from the web page. You can use, for example, Poll component. But here I will useRemoteCommand. To solve the second problem we will use call-back parameters (the mechanism of passing data from the server to the client’s web-page). In my implementation we won’t need to solve the last problem. It will be solved automatically.

Let’s get the ball rolling!

Creating a simple ajax chat with PrimeFaces

An ideal Enterprise application should be 4-tier i.e. consist of 4 modules: Client side, Web-module, EJB-module and database. The ideal Java EE application structure is shown on the picture below.  In this tutorial we won’t use any real databases. We just emulate one using synchronized array for storing messages.

To create a chat you will need:

  1. Netbeans IDE 7 with JavaEE
  2. PrimeFaces 3

Create a Web-application project in NetBeans IDE and choose Java Server Faces for preferred web-framework. Also you have to add PrimeFaces library into your project.

Create a package simplechat.ejb. Then create a class MessageManager and an interfaceMessageManagerLocal. Our EJB module will emulate  a database and we will use it for obtaining and sending messages.

MessageManager.java

package ru.reshaka.labs.chat.ejb;

import java.util.Collections;
import java.util.Date;
import java.util.LinkedList;
import java.util.List;
import javax.ejb.Singleton;
import javax.ejb.Startup;
import ru.reshaka.labs.chat.Message;

/**
 * Simple chat logic
 * @author Danon
 */
@Singleton
@Startup
public class MessageManager implements MessageManagerLocal {

    private final List messages =
            Collections.synchronizedList(new LinkedList());;

    @Override
    public void sendMessage(Message msg) {
        messages.add(msg);
        msg.setDateSent(new Date());
    }

    @Override
    public Message getFirstAfter(Date after) {
        if(messages.isEmpty())
            return null;
        if(after == null)
            return messages.get(0);
        for(Message m : messages) {
            if(m.getDateSent().after(after))
                return m;
        }
        return null;
    }

}

MessageManagerLocal.java

package ru.reshaka.labs.chat.ejb;

import java.util.Date;
import javax.ejb.Local;
import ru.reshaka.labs.chat.Message;

/**
 * Local interface for chat lagic EJB
 * @author Danon
 */
@Local
public interface MessageManagerLocal {

    void sendMessage(Message msg);

    Message getFirstAfter(Date after);

}

This classes represent a singleton start-up Java bean. This will give as a global point for accessing messages. If you want to use real database, you should use a simple stateless EJB instead.

As you can see, our implementation is very simple. We just have a list of messages inside to which we can access safely using methods of our singleton. MessageManager.sendMessage(msg) – adds new message into the list.MessageManager.getFirsAfter(Date) returns the first message that was sent after specified date.

Now that we created EJB-part of our application, let’s create the web-part. Add new package simplechat.webinto project and create a class Message in this package.

Message.java

package ru.reshaka.labs.chat;

import java.io.Serializable;
import java.util.Date;
import javax.faces.bean.ManagedBean;
import javax.faces.bean.RequestScoped;

/**
 * Represents message
 * @author Danon
 */
public class Message implements Serializable {
    private Date dateSent;
    private String user;
    private String message;

    public Date getDateSent() {
        return dateSent;
    }

    public void setDateSent(Date dateSent) {
        this.dateSent = dateSent;
    }

    public String getMessage() {
        return message;
    }

    public void setMessage(String message) {
        this.message = message;
    }

    public String getUser() {
        return user;
    }

    public void setUser(String user) {
        this.user = user;
    }
}

This is a plain Java object which represents a message. As you may notice the class implements interfaceSerializable. It is very important for exchanging data between all parts of our application. When Message object is transmitted it should be serialized.

The next thing we’ve got to do is to create a JSF managed bean in simplechat.web package.

MessageBean.java

package ru.reshaka.labs.chat;

import java.io.Serializable;
import java.util.Collections;
import java.util.Date;
import java.util.LinkedList;
import java.util.List;
import javax.ejb.EJB;
import javax.faces.bean.ManagedBean;
import javax.faces.bean.ViewScoped;
import javax.faces.event.ActionEvent;
import org.primefaces.context.RequestContext;
import ru.reshaka.labs.chat.ejb.MessageManagerLocal;

/**
 *
 * @author Anton Danshin
 */
@ManagedBean
@ViewScoped
public class MessageBean implements Serializable {

    @EJB
    MessageManagerLocal mm;

    private final List messages;
    private Date lastUpdate;
    private Message message;

    /**
     * Creates a new instance of MessageBean
     */
    public MessageBean() {
        messages = Collections.synchronizedList(new LinkedList());
        lastUpdate = new Date(0);
        message = new Message();
    }

    public Date getLastUpdate() {
        return lastUpdate;
    }

    public void setLastUpdate(Date lastUpdate) {
        this.lastUpdate = lastUpdate;
    }

    public Message getMessage() {
        return message;
    }

    public void setMessage(Message message) {
        this.message = message;
    }

    public void sendMessage(ActionEvent evt) {
        mm.sendMessage(message);
    }

    public void firstUnreadMessage(ActionEvent evt) {
       RequestContext ctx = RequestContext.getCurrentInstance();

       Message m = mm.getFirstAfter(lastUpdate);

       ctx.addCallbackParam("ok", m!=null);
       if(m==null)
           return;

       lastUpdate = m.getDateSent();

       ctx.addCallbackParam("user", m.getUser());
       ctx.addCallbackParam("dateSent", m.getDateSent().toString());
       ctx.addCallbackParam("text", m.getMessage());

    }

}

This managed bean we will use fin our web-page for sending and receiving messages. It stores the date of the last message which was received. And the client will request only new messages, which wasn’t received yet.

For passing messages to the client side (web-browser) we use the mechanism of call-back parameters. The data are serialised and transmitted in JSON format.

index.xhtml

<?xml version='1.0' encoding='UTF-8' ?>
<!DOCTYPE html PUBLIC "-//W3C//DTD XHTML 1.0 Transitional//EN" "http://www.w3.org/TR/xhtml1/DTD/xhtml1-transitional.dtd">
<html xmlns="http://www.w3.org/1999/xhtml"
      xmlns:h="http://java.sun.com/jsf/html"
      xmlns:p="http://primefaces.org/ui"
      >
    <h:head>
        <title>Chat test!</title>
    </h:head>
    <script type="text/javascript">
        setInterval("nextMessage()", 200); //update the chart every 200 ms               

        function updateMessages(xhr, status, args) {
            if(!args.ok) return;
            $('#chat').append('<div>[' +args.dateSent+ '] <strong>'+args.user+'</strong>: '+args.text+'</div>');
        }

    </script>
    <h:body>
        <h:form prependId="false">
            <h:panelGrid columns="2">
                Name: <p:inputText value="#{messageBean.message.user}"/>
                Text: <p:inputText value="#{messageBean.message.message}"/>
                <p:commandButton type="reset" value="Clear"/>
                <p:commandButton value="Send!" actionListener="#{messageBean.sendMessage}"/>
            </h:panelGrid>

            <p:remoteCommand name="nextMessage" actionListener="#{messageBean.firstUnreadMessage}" 
                             oncomplete="updateMessages(xhr, status, args);"/>
        </h:form>
        <hr/>
        <h3>Live chat</h3>
        <div id="chat"></div>
    </h:body>
</html>

On the web-page, there are: a form for sending messages, a message box for displaying messages and a PrimeFaces RemoteCommand component. This component invokes MessageBean.firstUnreadMessage()method using ajax request. When the request is completed, a javascript function updateMessages(xhdr, status, args) is called. The function gets call-back parameters and adds new message in the message box if there is one.

Also, web-browser should request new messages repeatedly. We can make him do that using setInterval(“nextMessage()”, 200).

Now you should get the following directory structure in your Netbeans project:

Simplechat - Netbeans

Screenshots

Simple Chat in Action [screenshot]

Improved version

Improvement

This implementation has one disadvantage. We get only one message per one call. But how to pass several messages in one request? Well, there is a trick. To pass an array or a list of objects from JSF bean to browser we should create JSONArray and pass it as string. I don’t have time to show you how to do it and prefer to leave it for your own investigation. Good luck!

Andriod-OS

Tux, the Linux penguin

Google’s Android is an operating system and software stack for mobile devices. Under the hood, it uses a customized version of the Linux kernel. Android is currently the fastest growing mobile operating system and is generating quite the buzz. If you are curious about it, you can give it a try without having to buy an Android smartphone. Let me tell how to do it.

(You can also check our introductory article on Android here)

LiveAndroid is a project that provides a LiveCD for Android running on x86 platforms. With a Live CD (or Live Distribution) you are able to test an operating system without altering the already installed OS or any files existing on the computer’s storage devices. The user can return his PC to its previous state when he is done with the LiveCD. LiveAndroid does not fully support the Android OS, but the most important stuff are included in the distribution (with more added with each release).

LiveAndroid can also be used with a virtualization application. I will show you how to install it on VirtualBox. You can find the ISO files in the downloads section of the project, the current version being 0.3. There are two distinct ISO files for that version:

  • liveandroidv0.3.iso.001
  • liveandroidv0.3.iso.002

The two ISO files have to be joint before proceeding with the installation.

If you are running Linux, this is a matter of a single command:

→ cat liveandroidv0.3.iso.001 liveandroidv0.3.iso.002 > liveandroidv0.3.iso

If you are running Windows,

use HJSplit(http://www.freebyte.com/hjsplit/ orhttp://www.freebytesoftware.com/download/hjsplit.zip) to join it.

(I remember this tool back from the glory days of floppy disks)

Run HJ-Split → Choose Join → Select “Input File” → Locate the .001 file → Hit “Start”

After the ISO file is ready, start up your VirtualBox application and hit the “New” button to create a new virtual machine.

Follow the wizard and on the “VM Name and OS Type” choose the following:

On the next screen, we select the virtual machine’s amount of memory. Since we are talking about a mobile phone OS, I chose only 128MB.

Next, we select the hard disk image that will be used to host our new virtual machine. Select the “Create new hard disk” option.

That will launch the “Create New Virtual Disk” wizard.

We then have to select the hard disk’s storage type. I chose “Fixed-size storage”. That will reserve all the configured disk amount up front and will not allow the machine’s disk to expand.

Next, we select the disk’s location and size. The location should be “AndroidOS”, since that is the new virtual machine we have created for Android. I chose 512MB for the hard disk. Again, remember that we are talking about a mobile phone OS here.

After all these, we get a screen with the summary of our new hard disk configuration.

After we click finish, we are presented with the new virtual machine’s configuration summary. If everything looks OK, hit “Finish” to create the VM.

After the machine is created, you will see it in the left panel. Select it and hit the “Start” button to power it up. Since this will be the first time this machine boots, the “First Run Wizard” will appear.

We have to select the installation media, i.e. the source from which the machine will boot and will be used for the installation. That will be the ISO file we have created, so hit on the folder button on the right side of the “Media Source” subpanel.

The “Virtual Media Manager” screen appears. Hit on the “Add” button, we want to add a new media source.

In the new window, browse to the location of the joint ISO file (named “liveandroidv0.3.iso”) and select it for our media source.

Once it is selected, click “Next” to continue.

The summary page of the “First Run Wizard” appears, listing our option. Hit “Finish” to proceed.

The virtual machine will boot from the provided ISO file and after a number of messages, you will see a screen prompting you to choose the desired screen size. (Ignore any messages regarding the color depth settings).

Choose the desired screen size (I chose 800×600) and press “Enter”. The first screen of your new OS will appear. Well done!

You can play with the Android OS, checking out its cool features. Fire up the Browser (it is based on WebKit if I am not mistaken). The home page is Google, obviously. Start typing a new address and hit the “Go” button that will appear. I have to admit that the available web browser is much more powerful than I believed it was.

Here’s how our home page looks like:

Use Hidden International Wallpapers and Themes

When you first install Windows 7, it asks for your language, time and currency. Based on your responses, it installs a set of wallpapers and themes. If you choose English (United States) for your time and currency format, for example, the available desktop backgrounds and themes will include a United States section with scenery from locations such as Maine, the Southwest and so on.

Hidden, though, are background scenery and themes from other English-speaking countries — Australia, Canada, Great Britain and South Africa. Normally, you can’t access those backgrounds or themes, but there is a simple way you can install and use them:

  • In the search box in the Start menu, type C:\Windows\Globalization\MCT and press Enter. (Note: If Windows 7 is installed in a drive other than C:, use that letter instead.)
  • Windows Explorer will launch and show you a list of subfolders under C:\Windows\Globalization\MCT: MCT-AU, MCT-CA, MCT-GB, MCT-US, and MCT-ZA. Each sub folder has wallpapers for a specific country: AU for Australia, CA for Canada, GB for Great Britain, US for the United States, and ZA for South Africa.
  • For any of the countries whose wallpaper and themes you want to use, go into its Theme folder, for example, C:\Windows\Globalization\MCT\MCT-ZA\Theme. Double-click the theme you see there (for example ZA).

Black horizontal HTML and CSS dropdown menu!!!

Simple and modern looking black menu template, horizontal dropdown web navigation. I will make and share more color skins in one of next posts. Customizable width size, current width of the menu is 950px (to change it edit 5th row in CSS file). If you have an average CSS knowledge, it will be easy to understand and update any detail in CSS code.


TO Download Click Link Given Below:
Black Horizontal Drop Down menu


Format: HTML and CSS

Color theme: black, gray

Size : 5KB.